HOW TO TAKE BETTER PHOTOS USING NATURAL WINDOW LIGHT ...but how do you find it and use it?

Recently, I gave you the 411 on light. For those who missed it, you can check it out HERE!
But my “previously-on-the-Bachelor” style recap for those who need a refresh: use only natural light (whenever possible) and make the most of it in your home!
Now I’m diving into how to find the BEST spots in your home *because what’s the point of knowing about natural light if you can’t find the yummiest spots?!* and what to do once you’ve found it!
FINDING THE BEST NATURAL LIGHT IN YOUR HOME
We start with good news! 90% of the time, the best light is where the BIGGEST window or set of doors is. Do you have a double or bigger window in a room? Maybe a sliding door (that doesn’t have a covered porch right on the other side)? If you open all the shades and blinds and walk through your house, you likely can identify the brightest room–and that is what you want!
Here’s a couple of things to consider:
- The brightest room will LIKELY change throughout the day! Rooms on the East and North side of your house will be brighter in the AM, and south and west rooms will be brighter as the day goes on.
- This one is really important: by brightest, we don’t necessarily want actual rays of sunlight streaming in through the windows. Those make for very HARSH light and very HARSH photos…instead, we want a generally bright space.
The next question is what to DO when you’ve found that best natural light–besides just busting out the Windex to wipe the kid hand prints + dog-nose-smears off those windows! …just me? 🤷🏼♀️
Here it is, and this is KEY:
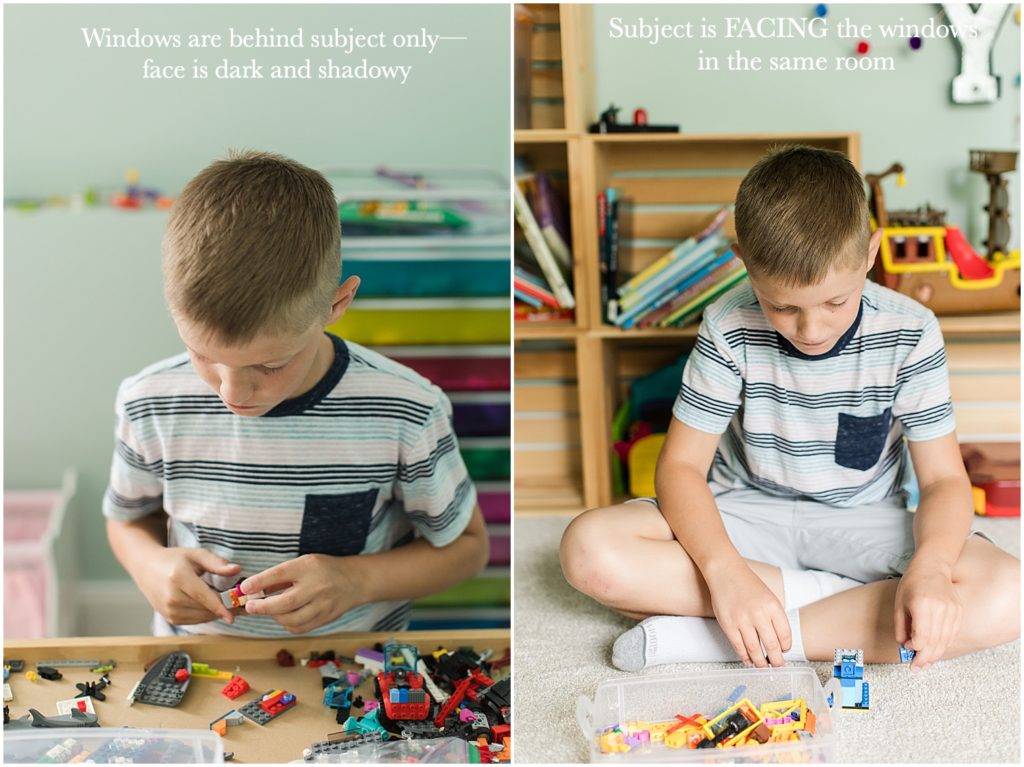
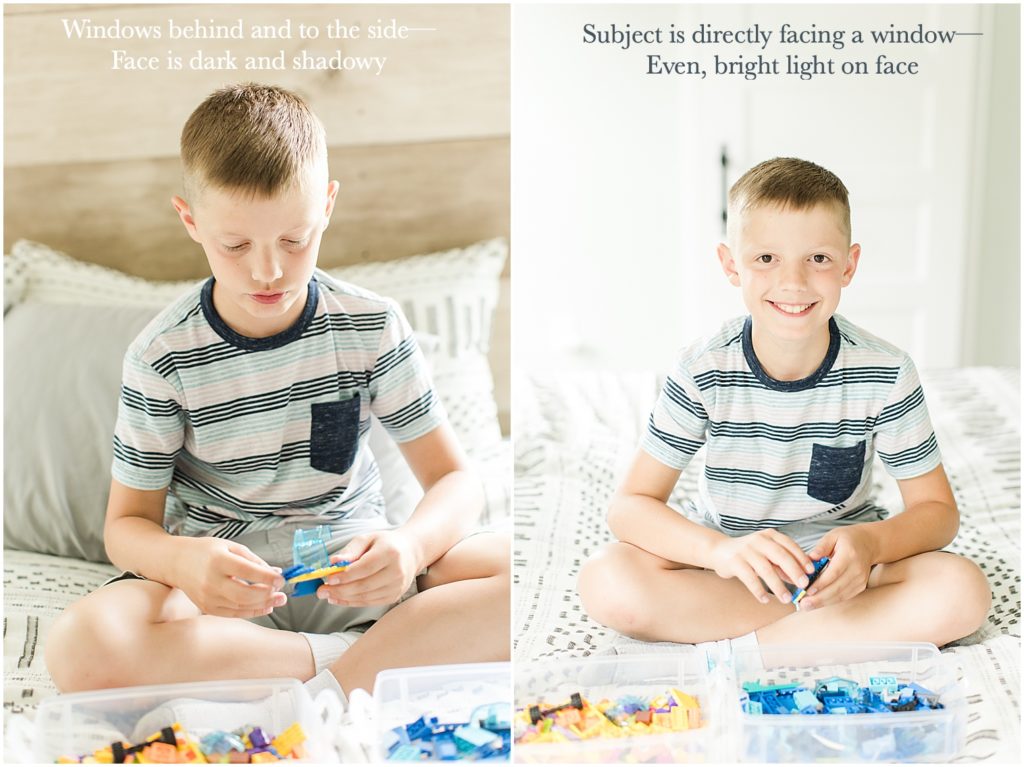
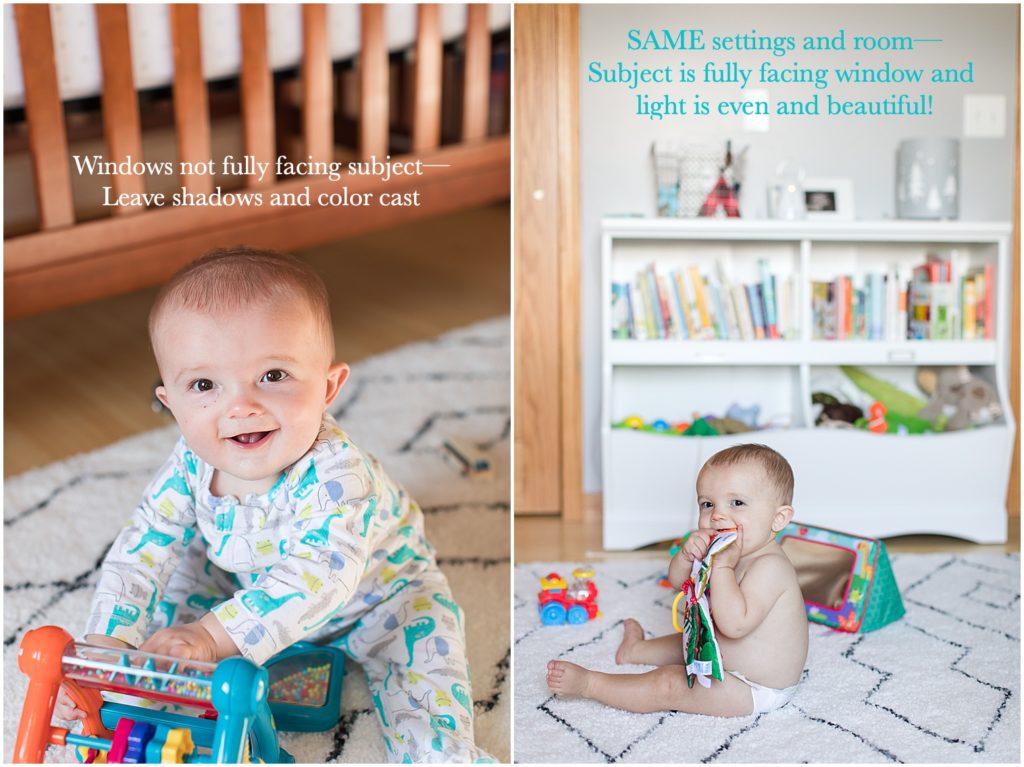
SET YOUR SUBJECT UP F A C I N G THAT LIGHT!
You might need to adjust how close your subject is to that that light source (IE the window or door) to get the light that you think looks the best! As the photo taker, your BACK would be to the window/door, so you might need to move your subject away from the light based on the space you need to fit in there as well.
Tip: try to set up your kid with a coloring book or favorite toy, or your dog with their favorite chewtoy, and take a couple of photos in that light to see what you think! You might have to move a bit around to make sure your shadow isn’t on your subject and that the light looks best, but give it a try. And pro tip: try calling your subjects name for a quick smiling at the camera photo at the end.


So quick recap: identify the room with the best natural light, put your subject FACING the light source in that room (the window or door), and see what happens! Once you learn to FIND the light– then we can figure out what to actually do with your subject once they are there!
If you want to see the video version of this on youtube, check it out HERE (and make sure to subscribe so that you can see future videos- they are all short and sweet because I know your schedule looks like mine and ain’t no one got time for long videos!)!
Edit your cell phone photos with just ONE click to either "fix" an issue or add beautiful "flair" and style to your photo!
JILL GUM Everyday
Fix and Flair Presets
INTRODUCING
LEARN MORE
before / after
Leave a Reply
I'm Jill, a wedding and portrait photographer based out of Chicago and Central Illinois, and available world wide! I'm also a photography educator, wife to my favorite person on the planet, mama to 3 amazing kids and an energetic Aussie, and obsessed with statement jewelry and all desserts (especially fruit pies!).
As a past high school teacher, I have a major heart for education. After going full time in my business, I have built a business I love that gives me an almost 6 figure salary and allows me to be home part time with my kids. I dream for you to run a business that enhances your life and lights you up, and I believe I can help you learn how to do it with a little hustle and a lot of heart!
click to learn more about me
Hello Friend!
Are you a Photographer?
Start HERE!
Are you a mom/hobbyist?
Start HERE!
You're in the right place! As a past high school teacher, educating others is my life's work and a HUGE part of my business! I have been teaching moms and hobbyists how to use their camera from first purchasing it all the way to coaching them into businesses of their own, and I'd love to help you as well, wherever you are (and whatever camera you have!).
I'm so glad you are here! Teaching Photographers and other small business owners how to run more joyful, successful, and profitable businesses is one of my favorite parts of my business! I specialize in working with photographers to make their goals a reality (or figure out what their goals should be in the first place!).
Click to leave a blog Comment!
We love reading your thoughts! Please also feel free to share the post using the links below!